
Welcome to My Income Journey’s tutorial on how to start a website! If you are looking to make money from home, on your own time, and with very low startup costs, then having a website/blog is my #1 recommendation. The potential for online income is huge and the risk is almost none. Within 3 months of starting My Income Journey I started seeing profits and have enjoyed monthly income ever since. My goal is to help you on your own income journey by offering this free step-by-step tutorial that teaches you exactly the process I used to create an income-generating website. If you are looking to create a website for your business, make money writing blog posts, launch an online course, sell your own products, or master affiliate marketing, this is how you begin! Read through the steps below and you too can improve your financial situation by earning money from home.
Step 1 – Choose Your Domain Name
The first step in your blogging journey is to figure out what your website is going to be about and to pick a name that represents you and your site. What is it that you want to blog about? If you are creating a website for a specific business that you’ve already started, then this decision is easy. If you are brand new to blogging and just starting your online business then you need to make sure you have a vision in mind. The best performing blogs have a specific goal in mind and their readers know why they are there and what the site is about. Once you’ve decided what your blog should be about, here are some tips for choosing an awesome, memorable domain name.
Keep it Simple
Nobody is going to remember your name if it is too long or contains irrelevant words. My website could have been www.myjourneytoworkfromhome.com or www.howtomakemoneyasastayathomemom.com, but who is going to remember that? And you’d probably get a typo if you manually typed that into a URL. Try to keep your name at three words maximum. Most of the one-word domains are already snatched up, but that isn’t necessarily a bad thing. Here’s why.
Describe Your Business
When a person first finds your site, they want to know what the site will do. Let’s say I wanted to start another site similar to My Income Journey and I picked the domain name MyStockIncome.com. It’s a great name, but do you know what it would be about? I’ve traded stocks on the stock market from home and I also do stock photography. So that site could go either way for me. I would prefer the name MyStockPhotoIncome.com or MyStockTradingIncome.com or MyStockTradingJourney.com so people know instantly what the site was about. Those are great names that are available right now, maybe I should grab them.
Check Domain’s Availability
Most of the time your first, second, third, or top five choices will be taken. Remember to check that the name is available for every social media site you want to be active on. You’ll want to own the name in every network you can. This is very important because this is your brand! You want the same, recognizable name or brand on every social media site you post to. Thankfully you don’t need to manually try each site individually. Go to www.namecheckr.com and type in the domain name you want to check. It will automatically scan all the different social sites to see if it’s available. Here’s a screen shot of how it looks.

Notice how it tells me if .com or .net or .org is available? There are also new extensions being offered like .photography or .company or .design. These aren’t too common yet and some browsers don’t recognize them as an actual URL so they’ll think you’re doing a search instead of taking you to that site. I think new extensions will catch on soon enough, but there’s still plenty of great .com names available. What I love about namechkr is knowing if the domain is available on instagram, facebook, youtube, etc. If you look at my screen shot you’ll notice the name I tested isn’t available on Pinterest, and there’s a warning sign on Twitter. The reason for the Twitter warning is your Twitter name can only be 15 characters long. I was lucky that myincomejourney is exactly 15 characters!
Think Twice About Numbers or Hyphens
Unless there’s a legitimate reason for your URL to contain numbers (like Forever21), avoid it. It makes your website appear like it isn’t the top player in its field. Let’s say I were to use www.myincomejourney3.com because I think it’s cute that I have 3 kids and I want to include them. That’s nice and all, but it just doesn’t look as professional as www.myincomejourney.com. One of the stock photo sites that I have a few pictures for sale is 123rf.com. I saw their name listed on other sites as a place to sell stock photos with and dismissed them at first. I don’t mean to throw them under the bus, but I didn’t believe they were a legit site because of their name.
Avoid Legal Issues
Trademark laws protect a trademarked name in domains. For example, if you’re starting a blog about how to save money at Disneyland, don’t use the name Disney in your URL. If you do, you’re breaking trademark law. You might be able to get away with it for awhile, but if you start getting noticed and the trademark owner finds out, you will most likely have to change your name and that would be a huge headache. Best to just avoid that issue altogether, there are plenty of good names still available.
How to Purchase the Domain
You can get a free domain name when you purchase your hosting from BlueHost in step 2, so follow me there and let’s secure your piece of cyber property!

Step 2 – Setting Up Your Hosting
The company that hosts your website is basically the company that makes it available on the internet. They provide your storage space as well as internet connectivity, so it’s very important to have a good host. I highly recommend using BlueHost to host your site. Plus if you use them, you will get your domain name for free!
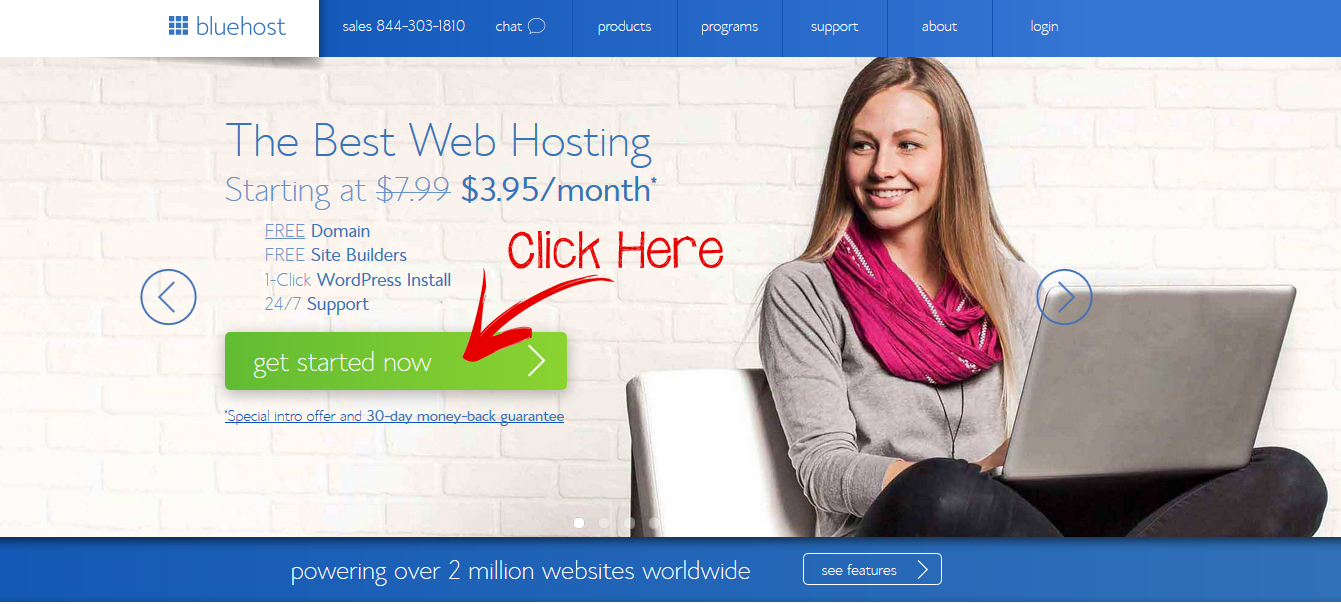
Use my BlueHost link and you’ll get hosting for $3.95/month and your free domain. There aren’t many businesses that you can start for this cheap, it really is an awesome deal! Click here to get started.
Now you’ll see a screen similar to the image below, click the “get started now” button.
After clicking “get started now”, you’ll be taken to a page to select your plan. I recommend either the “basic” plan or the “plus” plan. I went with the “plus” plan because my husband also started a site and we wanted the unlimited websites and space. If your budget is tight, then the “basic” plan will work just fine.

After you select your plan, you’ll be taken to a screen to officially register your domain (like we discussed in step 1). It’s exciting to make this step officially own your website!
Enter your domain name in the “new domain” box, unless you’ve already purchased your domain from somewhere else.
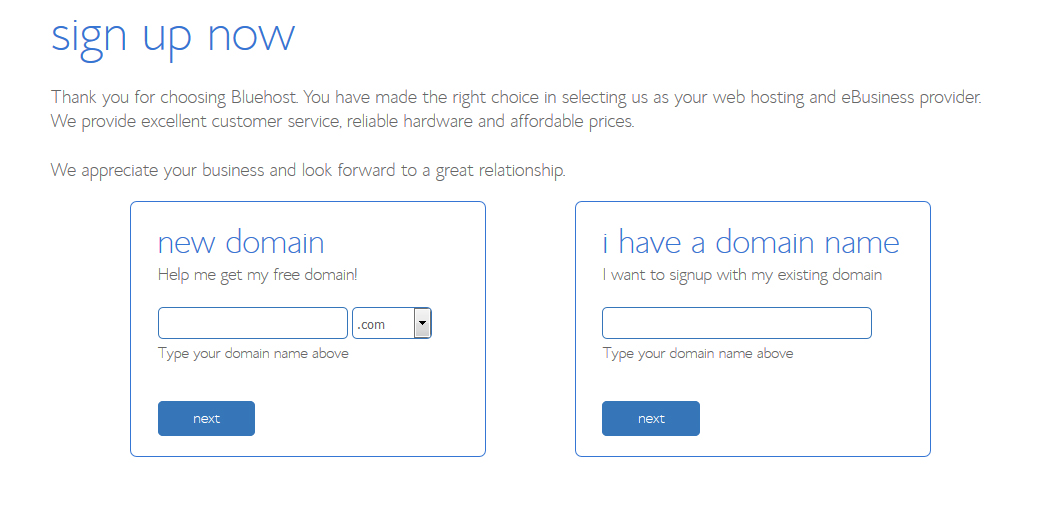
Next, you’ll enter in your account information.

Now select an account plan. If you notice, the $3.95/month is only available if you pay for 36 months. You can choose if you want to pay for 1 year, 2 years, or 3 years, and the price differences are there for you to consider. In reality, any of those options are a great deal for a professional site that includes the domain name purchase.
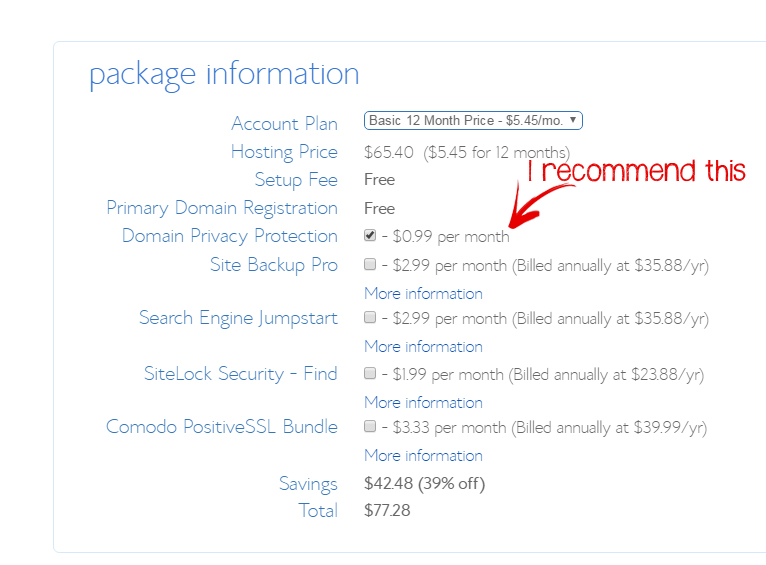
Notice that I recommend the “Domain Privacy Protection”. I suggest paying for this in order to keep your personal information private. All website owner’s information is available through Whois.net and other sites. Bluehost offers this privacy protection that will put Bluehost’s information available for the public to see rather than your own information. If you’re using a business address and phone number, then you probably don’t need the privacy, but if you’re using personal info then I think it’s smart. I skip the other extras.
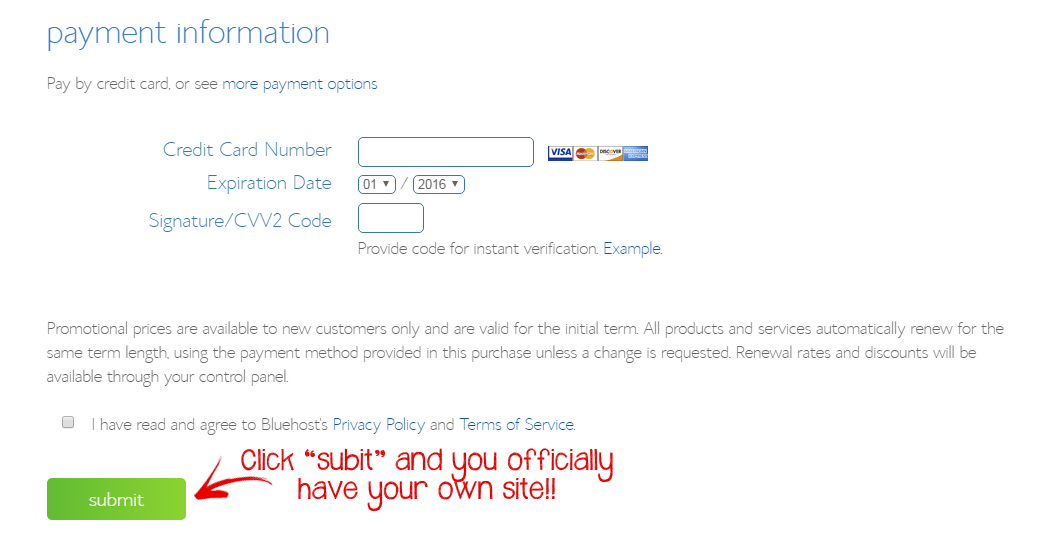
Now enter your payment information and then you’ll officially have your own website!
The next step is learning how to begin posting and get your site up and running. Don’t worry, it’s easier than you think. Thanks to WordPress you don’t have to be a computer programmer to have a unique, custom website.

Step 3 – Install WordPress
Now we’re going to install WordPress. WordPress is the software that gives you the ability to add plug-ins, widgets, create mailing lists, and more. It’s free and easily integrates with BlueHost. WordPress is the largest self-hosting blogging tool in the world and used by millions of websites including mine!
Log in to BlueHost and go to your control panel. Click the “install WordPress” button.
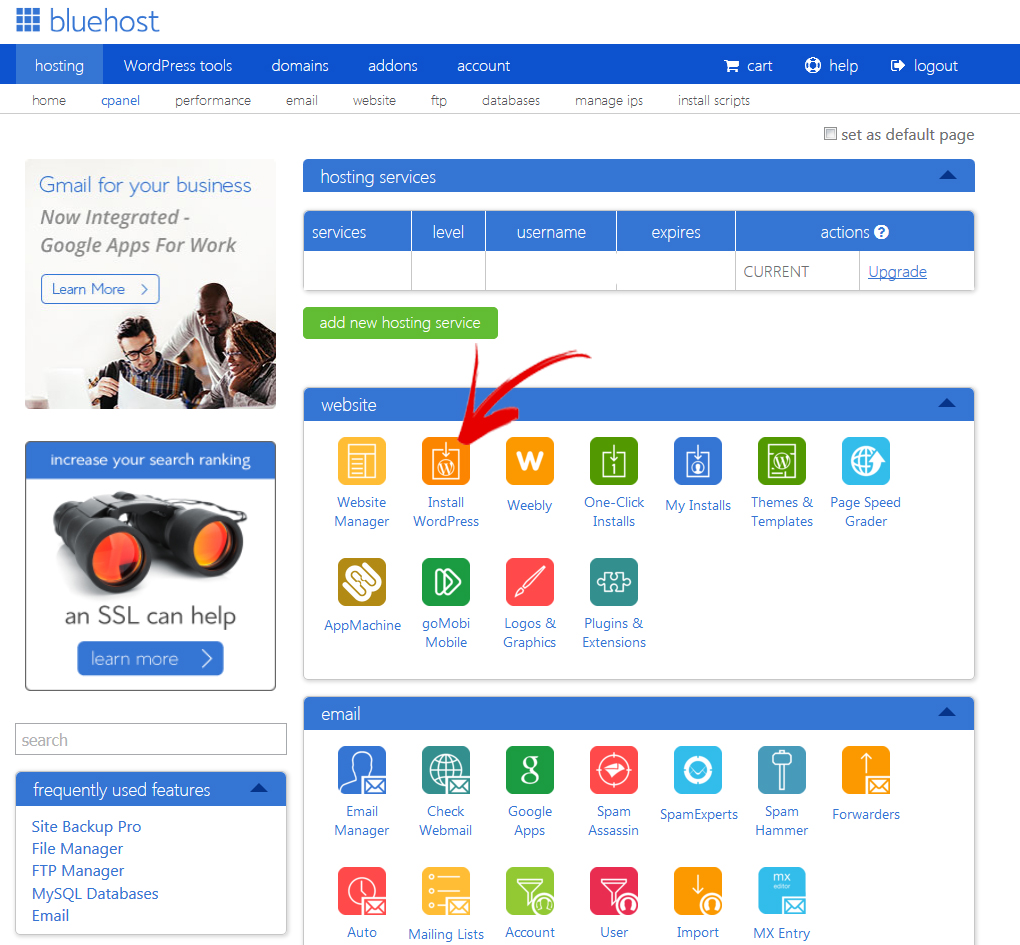
Be sure to create a unique admin username and password. This is what you’ll use to login to WordPress once it’s installed. Click “install now” and you’re all set with WordPress! Once it’s installed, you’ll be given an admin URL similar to this http://yourdomain.com/wp-admin. This URL is where you’ll go when you want to write posts, work on your site, etc. You’re basically done with the BlueHost side of things and you’ll just be dealing with WordPress from now on.
Bluehost has made some very helpful videos to help you learn how to use WordPress. Here is a short video showing what your WordPress dashboard will look like and a few basic features.
Here’s a more detailed video explaining how to create a page.
To watch all 10 of their WordPress videos, click here. You’ll learn about posts, plug-ins, themes, widgets, etc. If all this blogging lingo is new to you, I recommend watching these so you get a good foundation of how to fully utilize your site.
Wait!! Before you start spending hours customizing your blog, writing posts, and getting it looking all nice, you need to keep going through my tutorial and read the Design section. Choosing a theme is an important step in creating your site and getting it to function and look the way you want it. Go to the next tab to see what theme I recommend and why. It’s much easier to get a good theme now rather than try switching themes a few months down the road.
Step 4 – Designing Your Website
This part is really fun! Spend some time thinking about how you want the layout of your site. It’s much easier to set it up correctly the first time rather than change your mind and move everything around over and over again.
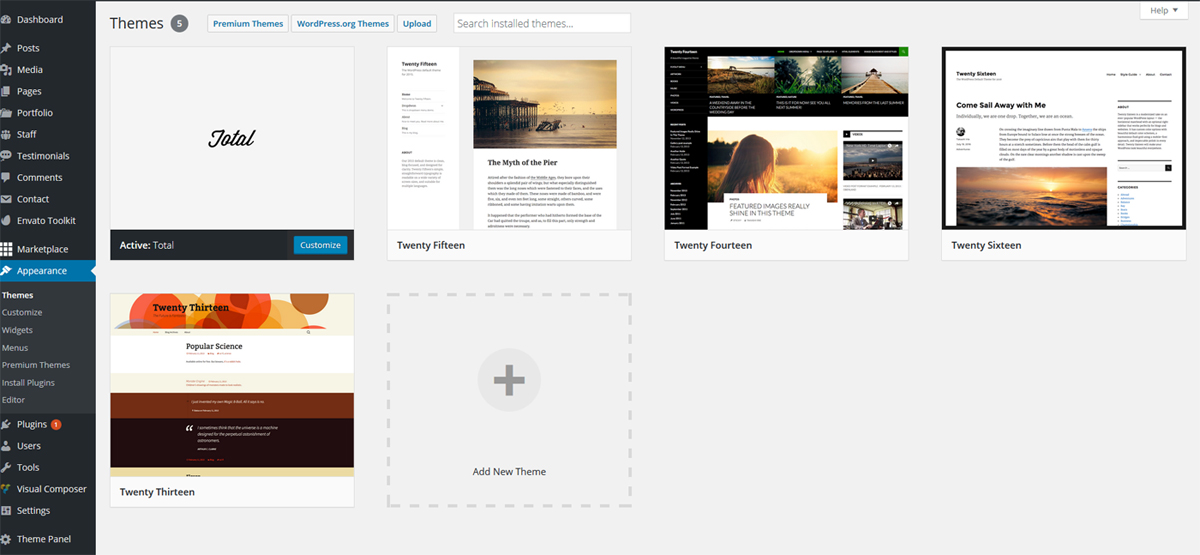
WordPress requires the implementation of a theme. A theme defines the look and feel of your website including colors, decorative features, and styles. Themes may also include advanced features such as post types, visual editors, contact forms, and more. When you first install WordPress, it will come with several free themes already installed. These themes are produced by WordPress themselves and are called “Twenty Sixteen”, “Twenty Fifteen” and so on depending on what year you start using WordPress. They can be found in the “Appearance -> Themes” part of your WordPress toolbar. To start using a theme you simply click on the “Activate” button next to the theme description.
These free themes work fine for beginners and include the basic post types, namely blog posts and static web pages. However, I recommend going with a paid theme right from the beginning. It can be a daunting task switching themes after having implemented one for even a short period of time and you’ll quickly find out that the free themes don’t have all the features and flexibility you will need. Free themes also don’t get updated as often, if at all, as the paid themes. This is a big deal if a new malware threat or WordPress update renders your website unusable. Developers of themes that cost money have an incentive to keep their themes compatible with WordPress updates and free of malware. Look for a paid theme that offers free lifetime updates. Paid themes quite often come with support for six months to a year with an option to pay for continued support. Thus if you run into an issue with the implementation of the theme, you can write or call the developers and get expert help. Another huge benefit of most paid themes is extras and add-ons that go beyond standard WordPress. These extras can really make your website standout in the crowd. Paid themes can be found in several places. Go to the “Marketplace” in your WordPress toolbar and you’ll be able to search for themes and other plugins via the Mojo Marketplace. The Mojo Marketplace isn’t the only place to buy themes and a quick search on the web will find others. I recommend going with a theme from a trusted developer. A little time finding the right theme now will save lots of headaches down the road.
I personally use and highly recommend the “Total” theme which is available via Theme Forest, another online theme marketplace. Like the name suggests, Total is the total theme. A few things set Total apart from the competition. First, it comes bundled with several plugins that by themselves would cost close to a hundred dollars. The “Visual Composer” plugin allows webpages to be created using an intuitive visual composer rather than raw html. This allows you to create awesome custom sites without knowing any programming language.
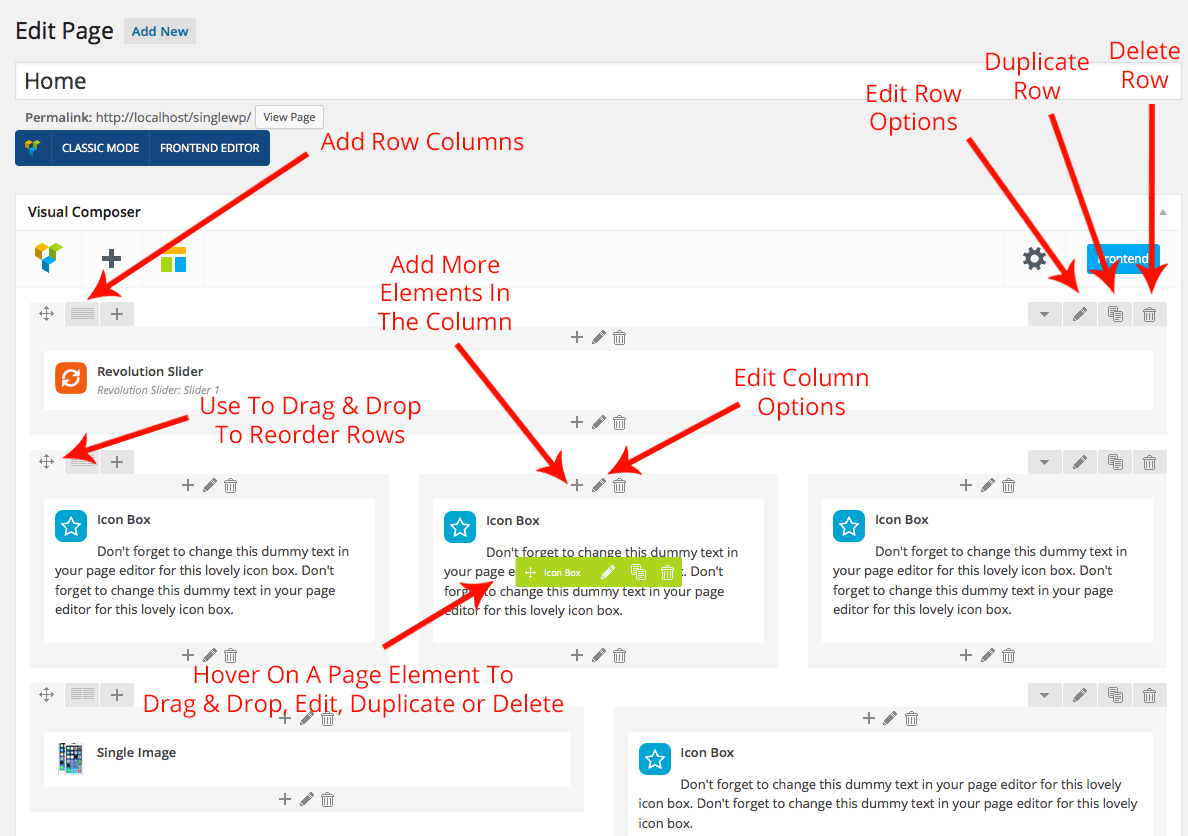
In addition to the basic post and page types, Total adds portfolio, staff, and testimonial types. These additional types can be customized as desired. For example, on another website I own I changed the “portfolio” to “books”. The real power of these types is that they allow for custom filtering and categorization. Filtering is a powerful tool that enables other great features of the Total theme: grids and sliders. Grids and sliders are graphical design elements that allow for an eye-popping display of graphics on your webpage which can be automatically filtered and sorted either by your visitors or you. The Total theme also comes with WooCommerce integration and custom contact forms. I have found that the Total theme is also updated rapidly. For example, WordPress recently released a major update. Less than a week later, I received an update to the Total theme to ensure compatibility. I’ve also taken advantage of their included six months of service to get answers to my development questions. Their help has been rapid and spot on. At about $59, the Total theme is one of the more expensive paid themes but with all the premium included plugins, such as the visual composer, excellent support, timely updates, and provided flexibility, the price is well worth it. Examples of what Total is capable of, in addition to my website, can be found here. Detailed tutorials describing all the great features are found here. Below is a video showcasing some of the awesome things you can do with the Total Theme. I personally love the “front end editor”.
Now your website is ready to be created! Get started by writing your first post, creating an “About Me” page, creating the layout and feel that you want! Having a website, especially one with a blog section, is an incredible way to make money from home. It is low-cost, anyone can do it, and the potential for profit is huge! Want to know one of the best ways to make money with your new website, click here to read about my favorite affiliate programs.
There are many good reasons to start a website/blog such as you want to teach others, to share an online journal of your life, to improve your writing, to share your passion, or to advertise for an existing business; but the main reason is to make money. Even if your main motivation isn’t for financial gain, there’s no reason to not monetize your blog. Blog monetization doesn’t make you a sell-out, greedy, or lessen the validity of your site. Making a website takes time and you should be compensated for your time and effort. Whether your site is about fashion, photography, food, or finances, there are many ways to make money with your site. Here’s how:
Ads
Might as well start with the obvious, ads are a great way to make money with a website. You probably won’t be able to quit your day job just from ads, but they can bring in a decent amount of revenue and should not be overlooked. Some bloggers claim to take the high road by not placing ads on their site. I can appreciate that since there are other ways to make money, but ads are a simple and fruitful way to start. If you’re worried about your site looking trashy and being covered in so many ads that it doesn’t even load, the good news is you can control that! This is your website, put as few or as many ads as you like and figure out what works.
The easiest company to get you started with ads is Google Adsense. Google has a lot of tools to help you analyze which ads are performing best, Adsense is easy to navigate, and it can integrate with Google Analytics (which you should definitely have on your site). I signed up with Adsense the first week after I purchased my domain. Google rejected me! Then I tried again a couple days later after having worked on my site a tiny bit, rejected again. Then I waited a week, rejected. I was starting to get annoyed, but to be fair my site had almost no content. After writing a few posts and adding some pages and images to my still very new site, I applied again and was accepted. Don’t give up if Google denies you a few times. They do require a certain amount of content, a legit site, an “about” page, and a “contact” page before they’ll approve you. But you don’t need a minimum number of pageviews or to wait a certain amount of time to get approved.
If you don’t want to work with Google Adsense, there are other alternatives. You can check out Chitika (no traffic requirements, I got accepted to them before Adsense), media.net (they’re the Yahoo! Bing network), infolinks (also no traffic requirements), and many others.
Affiliate Marketing
Affiliate marketing is the golden egg of blogging. Once you begin your affiliate marketing journey you’ll realize everyone is an affiliate and it’s possible to be an affiliate for almost anything! If you aren’t familiar with affiliate marketing, it’s a way to earn money by recommending other people’s products. It’s an awesome way for bloggers to earn money because all you have to do is let people know what products or services you like and if they buy that same product then you get commission for recommending it. You don’t need to sound like a salesman when recommending a product or compromise your writing style to earn money, simply link to the product you’re mentioning with an affiliate link and you’ll get money if a sale is made. You can affiliate link to anything (clothing, books, stores, whatever!). The best way to make money with affiliate marketing is to recommend products you personally use and would recommend to friends. That’s how I feel about Bluehost. I use them, I’d recommend them to friends, and I’m an affiliate for them. I make money if you sign up with them using my link here. It doesn’t change the price for you and sometimes I can offer you a better price than you’d get without using my link. It’s a win-win for me and Bluehost and for the person I’m recommending them to.
The easiest way to get started with affiliate marketing is to join an affiliate marketing network. These networks work with hundreds of companies and make it easy for you to become an affiliate for all sorts of places. Here’s my recommendations for affiliate networks:
1. ShareASale – As the name suggests, affiliate marketing is just sharing a sale. I’m recommending ShareASale first because they are my top performing affiliate marketing network. Once you’re accepted as a ShareASale affiliate, you then apply to be an affiliate for specific companies they represent. They’ve been in business for over 16 years, their website is easy to use, and they have thousands of merchants so they are great for any niche. Some of the companies include: Tailwind, Grammarly, BuyBackWorld, Checks Unlimited, DealFlicks, ModCloth, BornToSell, Sears, Zazzle, Checkout51, and more!

2. Amazon Associates – I’m recommending Amazon as my #2 choice because it is the easiest place to start if you’ve never been an affiliate, plus they have everything! Any product you use, book you read, movie you watched, beauty products you use, etc. can be found on Amazon. Once you’re an Amazon affiliate you simply link to the product mentioned in your post with your affiliate link and you get a percentage of the sale if someone buys something. The cool thing with Amazon is you not only get paid for the product you recommended, but if the person buys other things while shopping through your affiliate link you get a percentage of that too! For example, I recommend this piano book and someone clicks my Amazon link. They might buy the book, they might not, but let’s say they did buy a cell phone case. I’d get commission for the cell phone case even though I didn’t recommend it. If you want to support MyIncomeJourney while shopping on Amazon, use my affiliate link here and you’ll make my day!! (-:
3. FlexOffers – FlexOffers is my second highest grossing affiliate network. Similar to ShareASale, they have thousands of companies they work with so it’s easy to apply to become an affiliate for big names like Trip Advisor, Betterment, Kohls, Nike, Priceline, Gamestop, DirecTV, 123inkjets, and thousands more! Sign up for FlexOffers here.

4. ShopHerMedia – ShopHerMedia has accounts with many major brands and give their affiliates coupons and deals to pass on to their readers. One benefit to SHM is once you’ve been accepted to them you have access to all their campaigns. You don’t need to individually apply to be an affiliate with each company like you do with ShareASale and FlexOffers. Here’s an example of some of who SHM works with: Proctor & Gamble, Vanity Fair, Pampers, Baxter, Red Plum, and many more! Check them out here.

5. Target – Target doesn’t have quite the online presence of Amazon, but who doesn’t love Target? It’s easy to become a Target affiliate and you’ll be able to offer your readers deals like free shipping, set up gift registries, or clearance items. Sign up here to become a Target affiliate.
Create Your Own Products
Selling your own products can be a major income generator. You can sell an ebook, online course, digital products, or physical products. If you already have products that you’re selling on Etsy, Handmade on Amazon, or even at a physical store, add them to your website. If you don’t have a product in mind, creating an ebook or online course can be a natural extension of your site.
The income possibilities with having a blog/website are huge and the upfront cost is so minimal that I recommend it to anyone I know that is trying to earn money from home. I started making money with My Income Journey on month three and have enjoyed extra income ever since!